Carrier Payable Reconciliation Agency Bill
This process allows creating reconciliations for carrier agency billing.
To Reconcile Agency Billing
- On the Primary
menu,
click ORGANIZATION.
- Click the territories
tab.
- Click the Details
 icon of the appropriate
territory.
icon of the appropriate
territory.
- Click the accounting > transactions > reconciliation tab.
- Click [Add
New Reconciliation]. The Reconciliation dialog box is displayed.
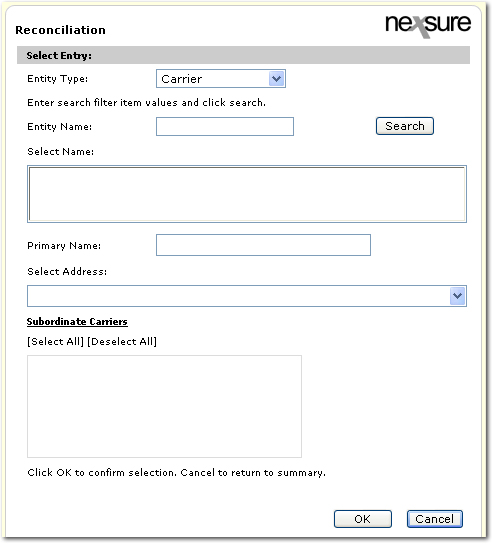
- In the Entity Type list, select Carrier.
- Search for the appropriate carrier and select a subordinate carrier if applicable.
- In the Select Name list, select the name of the carrier.
- In the Primary Name box, select the carrier. If there are more than one primary or subordinate names associated with the carrier selected, they are displayed.
- In the Select Address list, select the appropriate address for the carrier. Multiple addresses may be displayed if the carrier has more than one location.
- Click OK. The reconciliation tab is displayed.
Note: Use the Maximize / Minimize  icon to display the full screen view of the reconciliation.
- The Date Booked entry will default to the current date.
- In the Description box, enter a description for the reconciliation if necessary.
- In the Internal Note box, enter an internal note if necessary.
- On the Navigation Toolbar, click Save.
- On the Quick Navigation panel, click Transactions - Agency Bill. The policies that are available for statement entry transactions are displayed according to the search criteria selected.
- If policies to be used for statement entry transactions are not immediately displayed, click [Show] to open the search filters. The following options are available:

- Save Filter Settings: Selecting the Save Filter Settings check box on the Search Filters screen and clicking Search will change the default Search Filter setting. The next time the Transactions - Agency Bill screen is opened, the records returned will be filtered by the saved setting. Exercise caution when using the Save Filter Settings check box with a date range as returned policies will be restricted to that date range. As a general rule, check the filter settings each time this screen is accessed.
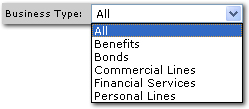
- Business Type: Select the business type for the transactions. The following selections are available:
- Line of Business: Select the line of business for the policies available for statement entry.
- All / Paid / Unpaid: Select an option from All, Paid or Unpaid to indicate the types of invoices to be returned in the search results.
- Branch: Select the branch where the policies available for statement entry reside.
- Department: Select the department where the policies available for statement entry reside.
- Unit: Select the unit where the policies available for statement entry reside.
- Date Type: Select the date type to be searched for after setting the date range. The following options are based on the dates found in the policy header:
- Date Effective
- Date Booked
- Date Range: Enter the beginning and ending dates in the date range to search.
- Amount Range: Enter, in dollars, the amount range to search.
- Policy Number: Enter the policy number to search.
- Client Name: Enter the name of a client to return results that include all transactions for a particular client. Enter at least one character to narrow the search results. Entering some of the Client Name returns a broader result, enter most of the name for more specific results.
- Item Id: Enter the item ID number.
- Bill To Name: Enter the bill to name of a client to return results that include all transactions for a particular client. Enter at least one character to narrow the search results. Entering some of the Bill To Name returns a broader result, enter most of the name for more specific results.
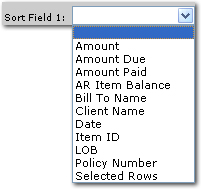
- Sort Field 1 and 2: The search results will be sorted by the column heading selected in the Sort Field 1 and / or the Sort Field 2 lists. The following selections are available in both sort field lists:
- Sort Order 1 and 2: Either Ascending or Descending may be selected to set the order of the policies available for statement entry returned. Ascending will set the order from A-Z. Descending will set the order from Z-A. The Sort Field 1 will be the first sort and Sort Field 2 will be the sub sort.
- Search: Click Search. The results of the Search Filter criteria and Sort Filter settings are displayed.
- Clear: Click Clear to remove all entries in the Search Filter and Sort Filters fields.
- Once the search results are displayed, select the policies to be paid in the Select column.
- Enter the Amount Paid for each policy.
- On the Navigation Toolbar, click Pay All Selected. A confirmation dialog box is displayed.
- Click OK to confirm the payments.
Or
Click Cancel to return to the Agency Bill screen without paying the selected items.
- In the Quick Navigation panel, click Reconciliation Posting. The Reconciliation Details screen is displayed.
- Review the Reconciliation Details and then click Post on the Navigation Toolbar. The reconciliation is posted.
Or
Click Abort on the Navigation Toolbar to abort the reconciliation and return to the reconciliation tab.
Related Topics
Revising Commission During Reconciliation